Live preview content with Gatsby js Wordpress and Netlify
Minh-Tri Le on Jan 15, 2024
Gatsby has merged with Netlify! Gatsby announced the discontinuation of Gatsby Cloud, advising users to migrate their websites to Netlify. This migration is simple, but it comes with a notable downside: the loss of the CMS Preview feature from Gatsby Cloud. This absence could notably affect the workflow for clients with websites previously built using Gatsby.js.
However after some research, I've successfully integrated previewing WordPress CMS content on a Netlify hosting. Let's dive into how we accomplished this.
The solution was quite simple:
- Add a Netlify Function to the Gatsby Site.
- Implement a Gatsby SSR (Server-Side Rendering) Preview Page.
- Customize the WordPress CMS to Complement the Preview Feature.
Gatsby works
1. Install a package.
Install
gatsby-plugin-netlify and @netlify/plugin-gatsby to make sure Gatsby site work normaly and turn on Gatsby SSR API on Netlify.Install
gatsby-plugin-netlify:npm install gatsby-plugin-netlify
Add
gatsby-plugin-netlify in gatsby-config.js:// In your gatsby-config.js
plugins: [`gatsby-plugin-netlify`]
Install
@netlify/plugin-gatsby, create new netlify.toml in your root of project if it not exist. Inside this file add config bellow:[[plugins]]
package = "@netlify/plugin-gatsby"
2. Set up Netlify functions on GatsbyJS
Create a folder at the root of the project called
.netlify/functions. By default, Netlify will look for this folder in order to run functions. You can use a different naming conventions by specifying the folder names under Netlify’s functions settings.Add a file called preview.js under this folder and add the code below. This is the format of Netlify functions:
/.netlify/functions/preview.js
const { ApolloClient, InMemoryCache, gql, HttpLink } = require('@apollo/client')
const fetch = require('cross-fetch')
// Execute the query
exports.handler = async function (event) {
    const { queryStringParameters } = event
    const pageId = queryStringParameters?.pageId
    // Set up an HttpLink with fetch
    const httpLink = new HttpLink({
        uri: process.env.WPGRAPHQL_URL,
        fetch: fetch,
        headers: {
            Authorization: `Bearer ${process.env.PREVIEW_SECRET}`
        }
    })

    // Set up Apollo Client
    const client = new ApolloClient({
        link: httpLink,
        cache: new InMemoryCache()
    })

    // GraphQL query
    const query = gql`
        {
            page(idType: DATABASE_ID, id: ${pageId}) {
                databaseId
                title
                slug
                content
            }
        }
    `
    try {
        const response = await client.query({ query })
        return {
            statusCode: 200,
            body: JSON.stringify(response.data),
            headers: {
                'Content-Type': 'application/json'
            }
        }
    } catch (error) {
        return {
            statusCode: 500,
            body: JSON.stringify(error)
        }
    }
}
I use two modules to make it easier for me to query the preview post data:
@apollo/client and cross-fetch.
On the query I pass the query string and dynamic pageId base on request URL so I can fetch right content of page.And I also have 2 enviroment variable is
WPGRAPHQL_URL and PREVIEW_SECRET, the WPGRAPHQL_URL is the GraphQL endpoint and PREVIEW_SECRET use to query draft content data, you will know how to get it in next step.3.Render the preview page using GatsbyJS SSR API
GatsbyJS provides an API called
getServerData to allow us to pre-render pages using server side rendering.In order to enable SSR on the preview page, simply add
getServerData function underneath the component. This is what I have under my pages/preview.js file:/pages/preview.js
// expose query and headers in order to provide the correct request context
const Preview = ({ serverData }) => (
  <>
    {serverData?.content && (
      <div>
        <h1>
          <span dangerouslySetInnerHTML={{ __html: serverData?.title }} />
        </h1>
        <div dangerouslySetInnerHTML={{ __html: serverData?.content }}
        />
      </div>
    )}
  </>
)

export default Preview
export async function getServerData({ query }) {
  // get the page/post ID from the url
  // preview page URL will look like this: https://mysite/preview?p=789&&page_id=13&preview=true...

  const pageId = query.p || query.preview_id
    const res = await fetch(
        `https://mysite/.netlify/functions/preview?pageId=${pageId}`
    )
    const result = await res.json()
    return {
        props: result
    }
}
Deploy your previous work to Netlify to activate your Netlify functions and the preview endpoint API.
Now, when you visit the live Netlify API endpoint at https://mysite.netlify.functions/preview?pageId=your-page-id, replacing
your-page-id with the actual page ID, you'll notice a 500 error. This occurs because a JWT (JSON Web Token) secret hasn't been included in the Fetch header.In the next step, we'll retrieve the JWT secret from the WordPress server to enable querying of preview data.
WordPress works
1. Generate JWT token for authenticated users on WordPress
WPGraphQL, by default, only allows public posts to be queried because that is how WordPress works, i.e., only public posts are visible to users.
The first few steps are to add some authentication over our graphql queries so that non-public posts can be queried.
-
Download this - https://github.com/wp-graphql/wp-graphql-jwt-authentication WordPress plugin either by cloning the repo in plugins directory or uploading the zip file via WordPress.
-
After the above step, you should be able to see the plugin in your plugins section. Don't activate the plugin now.
-
Add
define('GRAPHQL_JWT_AUTH_SECRET_KEY', 'secret_token');to yourwp-config.phpfile which is present in the /var/www/html folder. This secret key is used by the plugin to generate tokens to access non-public posts. Ensure the secret token is some random long string that should only be accessible to the WordPress server.It's recommended that you use something like the WordPress Salt generator https://api.wordpress.org/secret-key/1.1/salt/ to generate a Secret. -
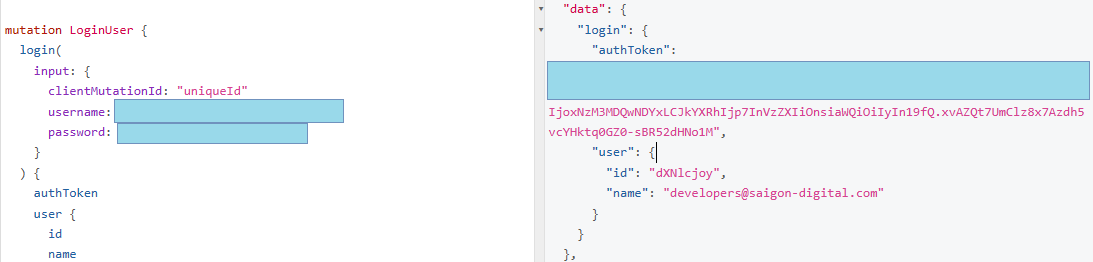
Activate the plugin, and query the following, you should replace
usernameandpasswordwith actual your username and password.
mutation LoginUser {
  login(
    input: {
      clientMutationId: "uniqueId"
      username: "your_login"
      password: "your password"
    }
  ) {
    authToken
    user {
      id
      name
    }
  }
}
Once your query is successful, you will receive a token. This token can be utilized in your code to query non-public posts. For optimal functionality, save this token as a Netlify environment variable, enabling Netlify functions to access it.
Once the above steps are done, the only thing left is how to use the token and get the non-public posts in your code.
Add SetEnvIf Authorization "(.*)" HTTP_AUTHORIZATION=$1 in your .htaccess file, which is present in the /var/www/html directory. If you haven't updated your .htaccess file before, it should look like below after updating it. This enables the Authorization header on the incoming request on the WordPress server. We will use the Authorization header to send the authenticated token.
# BEGIN WordPress
<IfModule mod_rewrite.c>
RewriteEngine On
RewriteBase /
RewriteRule ^index\.php$ - [L]
RewriteCond %{REQUEST_FILENAME} !-f
RewriteCond %{REQUEST_FILENAME} !-d
SetEnvIf Authorization "(.*)" HTTP_AUTHORIZATION=$1
RewriteRule . /index.php [L]
</IfModule>
# END WordPress
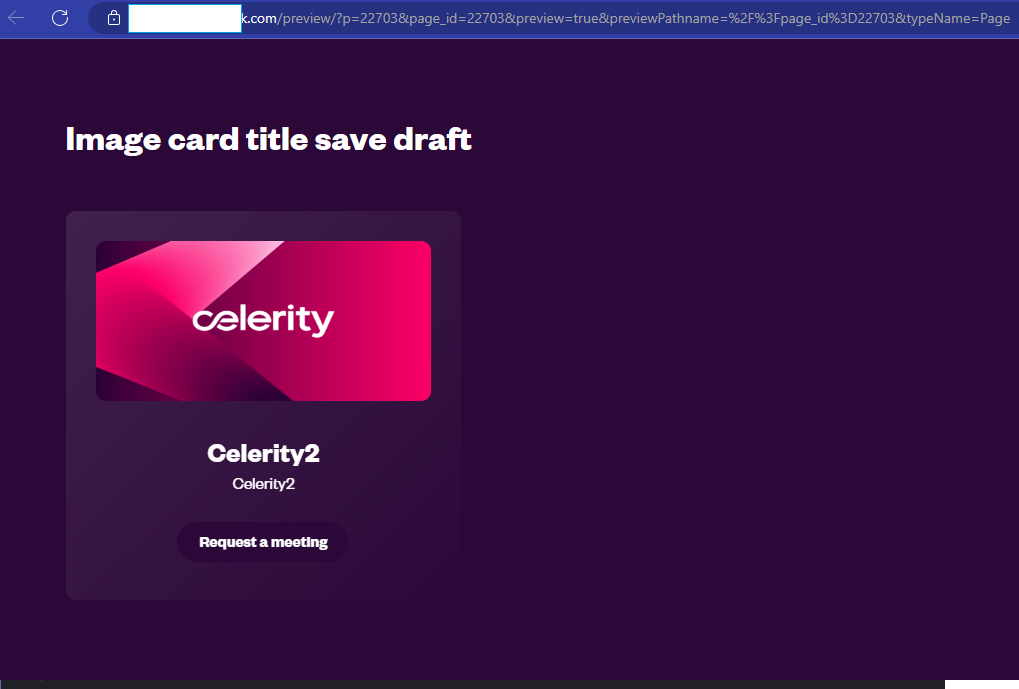
Now, when you access the Netlify endpoint again, you should see that your query has succeeded and is returning data.
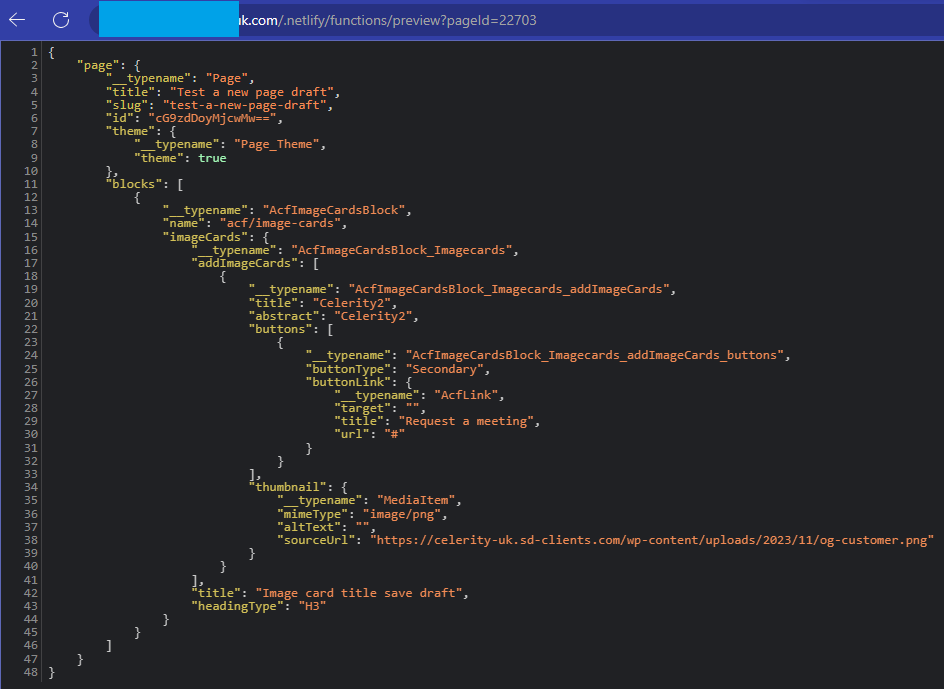
And your preview page will show your darft content.
Note: Usually, the JWT token resets every 300 seconds, and you need to get a new one. Instead of doing this often, I changed the settings inwp-graphql-jwt-authenticationto make the token last for one year. This saves time, but remember, longer-lasting tokens can be less secure. It's best to keep token life short, like 300 seconds, for safety, unless you're sure about what you're doing.
/plugins/wp-graphql-jwt-authentication/src/Auth.php
public static function get_token_expiration() {

		if ( ! isset( self::$expiration ) ) {

			/**
			 * Set the expiration time, default is 300 seconds.
			 */
			$expiration = 31536000;

			/**
			 * Determine the expiration value. Default is 5 minutes, but is filterable to be configured as needed
			 *
			 * @param string $expiration The timestamp for when the token should expire
			 */
			self::$expiration = self::get_token_issued() + apply_filters( 'graphql_jwt_auth_expire', $expiration );
		}

		return ! empty( self::$expiration ) ? self::$expiration : null;
}
2. Custom preview button URL
The final step involves customizing the WordPress preview button. This ensures that when you click on this button, WordPress directs you to the correct preview page endpoint.
/wp-content/themes/your-wp-theme/function.php
$frontend_url = 'https://mysite.com';

// Filter for the preview button
add_filter('preview_post_link', function ($preview_link) use ($frontend_url) {
    return str_replace(home_url(), $frontend_url, $preview_link);
});

// Filter for the view page button
add_filter('page_link', function ($link, $post_id) use ($frontend_url) {
    return str_replace(home_url(), $frontend_url, $link);
}, 10, 2);

// Filter for the preview button and change to custom URL
add_filter('preview_post_link', 'custom_preview_page_link', 10, 2);
function custom_preview_page_link($link, $post_id) {
    if (is_preview()) {
        // If it's a preview, change the URL to use 'preview' slug
        $link = home_url('/preview') . '?' . $_SERVER['QUERY_STRING'];
    }
    return $link;
}
The function's purpose is as follows:
- Locate the 'View Page' and 'Preview' buttons within WordPress.
- Change their URLs from the WordPress site to the frontend site.
- Modify the URL of the 'Preview' button to follow this format: https://mysite.com/preview?queryString...
This ensures that whenever you click the 'Preview' button, it redirects you to the correct Gatsby SSR preview page that we set up in the previous steps.
Sumary:
The process for the preview button is straightforward:
When you click the preview button, it takes you to the Gatsby SSR preview page. On this page, the getServerData() function requests data from an API endpoint hosted on a Netlify function. This function returns the draft content, which is then passed to your preview page as serverData. The preview page uses this data to display the draft content.
I hope this post assists you in integrating the preview feature into your site while we await Netlify's official support in the future. If you need any assistance or have questions, please feel free to leave a comment below. I'll respond ASAP 🧡